Wallpaper comes in hundreds of different patterns
and colors. It allows you to create the atmosphere of your choice
and add life to an otherwise ordinary room. Wallpaper is great for
rooms with less than perfect walls and is usually easy to clean
with soap and water.
Types of Wallpaper
Fabric- Difficult to hang because fabric will
stretch. Hard to clean and you must use a special clear paste.
Flocks-Patterns with velvet-like raised designs
either on paper or vinyl. Some types are washable and easy to
handle while others are not.
Embossed-Textured wallpaper made of paper or
plastic. Good to cover damaged walls, some can be painted and
are easy to clean
Natural Fibers- Made of natural and synthetic
fibers such as hemp or cork. Natural fibers are good for walls
that are damaged or uneven and exposed to very little moisture.
Hanging and cleaning can be difficult.
Foils- Adds brightness to the room by reflecting
light but should only be used on walls with no damage or flaws.
Use lining paper to cover less than perfect areas before hanging.
Very difficult to hang because of bubbling and creasing.
Vinyls- Most durable and the easiest to prepare,
hang, clean, and remove.
Effects Wallpaper Can Create
Horizontal pattern- Horizontal patterns can make
a room seem wider. If your home is not fairly new the ceiling
and the walls may not be perfectly squared. To make this less
obvious, avoid horizontal striped patterns.
Vertical Pattern- Vertical patterns can make
the ceiling in a room seem higher. If your home or building is
not fairly new, chances are the rooms are not square or perfectly
vertical. To make this less obvious, avoid vertical striped patterns.
Drop pattern- Pattern repeats diagonally across
the strip and will require additional paper to match up. A drop
pattern is a good choice if your room is not perfectly squared.
Tools & Materials
Pencils
Plumb bob
Utility knife (with extra blades)
Water trough for
prepasted paper
Smoothing brush
Paste brush & adhesive for nonpasted
paper
Paint roller
Seam Roller
Drop Cloths
Broad knife
Sponge
Sandpaper
Scissors
Tape measure
Stepladder
Wallpaper
Triangular Scraper
Primer
Wallpaper
How Many Rolls Do I Buy?
Good idea:
Make sure all of the rolls are from the same run number or dye
lot. Write down the dye lot or run number for future reference.
You can easily calculate the amount of wallpaper
needed by taking the square footage of the room and adding 15% for
waste.
Preparing the Area
Remove as much furniture as possible. Place drop
cloths on the floor around the base of the walls. Paint before you
begin wallpapering. Turn off electricity for that room at your circuit
breaker box and remove all electrical outlet covers and switch plates.
Preparing a Painted Area
Remove paint that is peeling with a triangular
scraper.
Use spackling compound to fill any dents, cracks,
or holes.
When dry, sand all patched areas and wipe clean
with water and a sponge.
Seal with primer and allow to dry.
If your walls are imperfect
and you are hanging thin wallpaper or foils, use lining paper to
cover the wall prior to wallpapering.
Seal the walls with primer.
Apply adhesive to the back of the lining paper
with a paint roller.
Hang the paper horizontally with strips approximately
1/8" apart.
Use a smoothing brush to remove any bubbles or
creases.
Use a damp sponge to remove any excess paste.
Allow the paper to completely dry.
Preparing Wallpapered Area
All old wallpaper should be removed before repapering.
Wallpapering New Walls
Apply primer with a paint roller and allow to
dry completely.
Select an inconspicuous corner to begin.
Mark the
Completely
submerge rolled strip in lukewarm water.
width of the paper minus 1/2" on the wall.
Use your plumb bob to mark a vertical line from the ceiling to
the floor.
From that point, mark the width of the paper
around the room to provide a guideline. Always start a new plumb
line when turning a corner.
Measure the distance from the baseboard to the
ceiling and add about 2".
Cut the first strip using a sharp utility knife
and straightedge. Subsequent strips may need to increase in length
to match patterns. Save remnants for smaller areas that may need
piecing together.
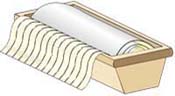
For unpasted paper, spread the strip, pattern
side down, on your flat working area. Using a brush or paint roller,
apply paste starting at the top and working from the inside out
to the edges.
For prepasted paper, roll the strip with the
pattern side in. In a half full tray of lukewarm water, completely
submerge paper. Allow paper to soak for 2-3 minutes.
To remove paper from tray, pull the edge out
slowly to allow excess water to drain off. Change the water in
the tray after every 6 strips of paper.
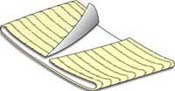
Book
the paper, folding the ends of the strip toward the middle.
Book the paper, folding the ends of the
strip toward the middle. Allow the pasted sides to rest against
each other for 3-5 minutes. DO NOT crease the folds.
Unfold the top section,
align with the ceiling and allow 2" overlap at the top. Move
the edge of the paper against the first vertical plumb line and
press into place. You will have 1/2" overlap on the opposite
side of the plumb line.
With a smoothing brush, remove air bubbles, going
from the top to the bottom and then from the center to the outside.
Unfold the bottom half and brush it into place.
If you get a bubble that won’t come
out, stick it with a straight pin and work the air out with the
smoothing brush.
Trim
excess overlapping paper with a utility knife.
Trim any excess overlapping paper by pressing the
broad knife blade into the seam between the object and the wall.
Cut the excess with the utility knife using the broad knife as
a straight edge. Make sure your blade is sharp to avoid tearing
the paper.
Wipe off any excess paste with a damp sponge
and clear water after each strip is hung.
Place the next strip of paper plumb to the previous
strip then smooth.
About 15 minutes after the paper has been up,
firmly press seams with a seam roller. Wipe off any excess paste.
Do not roll seams on flocks, foils, fabrics, or embossed paper.
Gently tap these seams with a smoothing brush.
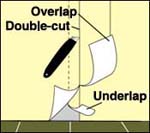
Trim strips that overlap each other in corners
using a vertical straightedge and cutting through both pieces
of paper at the overlap. Gently peel both strips off and seal
strips with a seam roller.
Wallpapering Around Obstacles:
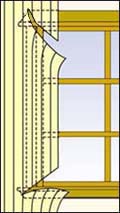
Cut
the wallpaper diagonally at the corners of window frames.
Windows and Electrical Outlets
Wallpapering around obstacles doesn’t have
to be difficult.
For a window, use a ceiling to floor length strip
and brush into place; pressing the paper as close to the seam
of the window as possible.
Where the wallpaper overlaps the window, cut
the wallpaper diagonally at the top/bottom corners of window frames.
Using the broad knife as a straight edge, press
paper into the crease and cut with a utility knife.
For electrical outlets, paper over the opening
and cut an X over the opening to expose fixtures.
Trim the paper around the inside edges of the
outlet using the broad knife and utility knife. Replace the plate.
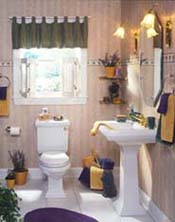
Wallpapering a Bathroom
Smooth
paper behind the toilet.
When wallpapering a bathroom, make sure to choose
a paper that will withstand humidity and is durable. Once you have
chosen your wallpaper, take a sample piece home, and rub it with
a wet sponge to test for colorfastness. Also, if the sample tears
easily, choose another paper.
Prepare the walls as you would in any other area.
Remove any existing wallpaper.
Remove bathroom accessories such as towel bars
and electrical covers.
Wallpaper directly over any brackets that cannot
be removed.
Cut an X with your utility knife through the
paper covering the bracket.
Press the paper securely around the bracket and
trim the excess using a straightedge and utility knife.
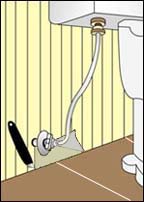
Work the paper behind the sink and toilet. To
smooth the paper in a tight place, use a small paint roller.
If the area behind the
sink or toilet is too tight, brush the wallpaper strip as close
to the edge as possible.
Trim the paper around the edge leaving a slight
overhang to be tucked between the object and the wall.
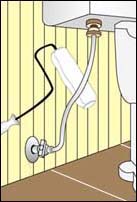
Slit
the paper from the bottom of the pipe to the floor.
To paper around fixture collars, slide the collar
back. Apply paper as close to the pipe as possible and slit the
paper from the bottom of the pipe to the floor.
Smooth the paper around the pipe and trim as
close as possible.
Slide the collar back on.
Hanging Wallpaper Border
For chair rail borders, mark a faint line around
the room at the desired height. Use a level to make sure your
line is even.
Measure the length of one wall and cut a strip
of border to fit. Allow a few inches for trimming.
Prepare the strip according to the type of paper
you have, prepasted or not.
Start in a corner following the line you marked.
Allow about 1/2" overhang. Smooth with a wallpaper brush.
Cut the next strip to match the pattern on the
previous strip allowing for a little overlap.
Double cut the overlap with a straightedge and
utility knife. Remove excess paper.


 Hanging
Wallpaper and Borders
Hanging
Wallpaper and Borders