 |
|||

"Tool of the Month"
|
Hep2O Basic
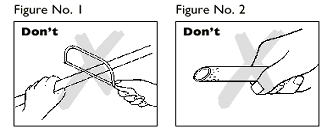
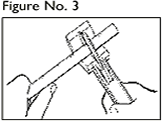
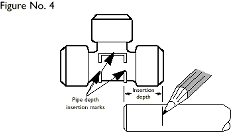
Jointing/Pipe Cutting When cutting Hep 2 O pipe it is essential to use the correct tools. Only the recommended cutters should be used. Do not use a hacksaw. (Figure No. 1) Before making a joint ensure the pipe end is clean, cut square and free from burrs and surface damage. (Figure No. 2). Place the pipe in the jaws of the cutter and apply pressure, the pipe should be rotated whilst maintaining the pressure until the pipe is severed. (Figure No. 3)
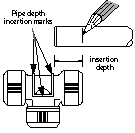
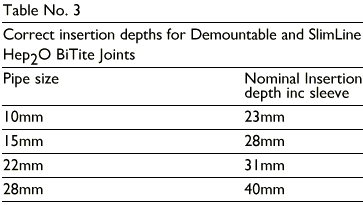
When it may not be possible to use the /\ marks eg. badly lit areas, jointing copper pipe or where an exact length is required, mark the insertion depth on the pipe using a pencil or suitable marker pen. The correct insertion depth can be obtained by holding the pipe against the fitting or by measuring with a rule, as shown in figure 4. The depth of insertion is shown in Table 3 at the end of this section.
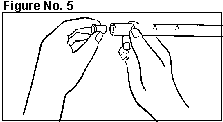
Support Sleeve: ALWAYS insert a Hep 2 O support sleeve into the pipe end. (Figure No. 5) It is essential to use a support sleeve in order to make a good joint. Failure to use a support sleeve will negate the guarantee (the only exceptions to this rule are when using copper pipe, or the spigot end of a Hep 2 O fitting).
Pipe Insertion: When using Demountable Hep 2 O BiTite fittings, DO NOT slacken the retaining cap prior to pipe insertion. This will not ease jointing. Push the pipe and fitting firmly together (Figure No. 6). Do not knock the fittings onto the pipe (Figure No. 7). A secure professional joint has been achieved when the socket of the fitting has reached the next '/\'mark (or pencil mark) on the pipe.
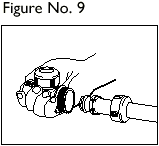
As a final
precaution, after jointing it is recommended that, whilst holding
the fitting firmly, the pipe is tugged back to check that the
joint is secure. Dismantling
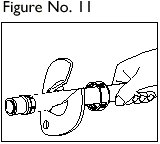
a Joint (Demountable
fittings only) Figure No. 9 Unscrew the retaining cap and remove
the pipe clear of the fitting. The grab
wedge and O ring will be in position on the pipe. Remove the
O ring from the end of the pipe. The grab
wedge can then be removed using the demounting tool. Provided
the grab wedge is undamaged, it can be re-used. REMEMBER
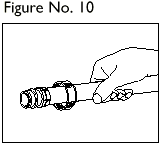
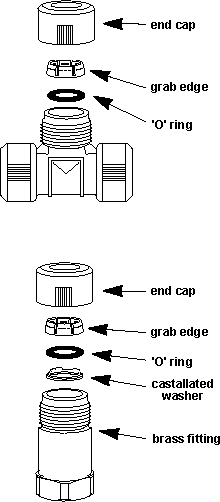
Re-assembling a Joint To re-assemble the fitting, insert the O ring into the fitting body until it rests on the cassellated ledge at the base of the socket. If necessary re-lubricate the O ring with Hepworth Silicone Lubricant. Check that the grab wedge is undamaged (replacement grab wedges are available. Insert the grab wedge into the fitting body with the flat face of the grab wedge against theO ring, slots facing outwards. Replace the retaining cap and hand tighten. The fitting is now ready for use. Figure No. 12
|


Get advice about...

![]()
![]()